Themeasy AI (beta)
Beta
Themeasy AI already builds complete sites, and we keep improving it.
Included in Pro and Agency during the beta. After the beta, Themeasy AI is part of the Agency plan.
What Themeasy AI is
Your own Claude builds a complete site through Themeasy's server: the pages, the header and footer, the menu, the contact forms, and the site's colors and fonts, all made with the Themeasy widgets. When the site is ready, Claude publishes it for one of your WordPress sites. On that site, the Themeasy plugin installs it from Themeasy → AI Studio as ordinary Elementor content that you edit like any other page.
- You work in your own Claude: the Claude app (Windows, Mac), claude.ai, or Claude Code. Themeasy provides the tools and the server, not the AI model: your Claude plan pays for the work.
- One sign-in: Claude connects with your Themeasy account, so it knows your plan and your licensed sites.
Watch Claude build a complete site with Themeasy AI (1:50).
From the brief in Claude to the site installed in WordPress with AI Studio.
Who has it
| Plan | Themeasy AI |
|---|---|
| Pro and Agency (the plugin or the Bundle) | Included during the beta |
| After the beta | Included in Agency |
| Themeasy Widgets, Free, and theme licenses | Not included |
You also need:
- The Themeasy plugin, up to date, on the WordPress site you build for, activated with the license of the same Themeasy account. See installing the plugin.
- A Themeasy theme, active on that site. Your plan includes all of them: download yours from Downloads in the Themeasy Hub. On another theme, AI Studio shows "AI Studio needs a Themeasy theme" and installs nothing.
- Elementor, which the Themeasy widgets build on.
Connect your Claude
You connect once. The first time, Claude asks you to sign in with your Themeasy account.
In the Claude app or on claude.ai
- In the Claude app (Windows or Mac) or on claude.ai, start a new chat, click +, open Connectors and choose Add custom connector.
- Enter Themeasy as the name and
https://ai.themeasy.co/mcpas the MCP server URL, and add it. - Connect it. The Themeasy Hub opens: sign in with your Themeasy account and click Allow.
That one connector works in the app's chat and in Claude Code inside the app. Claude's Free plan allows one custom connector.
In a terminal, if you prefer
- Run this line once:
claude mcp add --transport http themeasy https://ai.themeasy.co/mcp - Start Claude Code, type
/mcp, pick themeasy and choose Authenticate. - Your browser opens the Themeasy Hub. Sign in with your Themeasy account and click Allow.
- Back in the terminal, Claude Code confirms that it is connected to themeasy.
What the beta supports
| Where you use Claude | In the beta |
|---|---|
| The Claude app (Windows, Mac) and claude.ai, with the connector | Tested |
| Claude Code, in the app or in a terminal | Tested |
| Other apps that connect to MCP servers | Untested |
The sign-in page
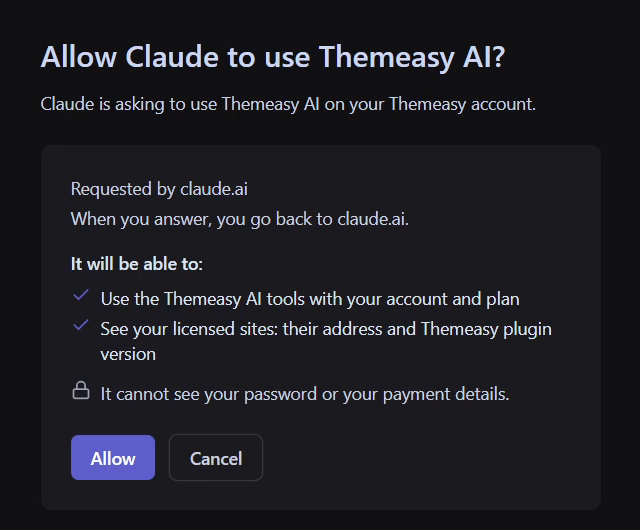
The Themeasy Hub asks whether to Allow Claude to use Themeasy AI. It lists what Claude can do: use the Themeasy AI tools with your account and plan, and see your licensed sites (their address and Themeasy plugin version). It can't see your password or your payment details.
When you connect from a terminal, the page also warns that the connection goes to a program on your computer. Allow it only if you started it yourself.
Build a site
Start a build
Tell Claude, in your own words, what the site is for: the business, the pages you want, the tone, the photos or the colors you have in mind. Ask for changes as often as you like.
- In the chat: check that Themeasy is on under + → Connectors, then ask, for example: "Use Themeasy to build a 3-page site for my bakery."
- In Claude Code in the app: type
/and pick a Themeasy command, or just ask Claude. - In a terminal: type
/and pick/themeasy:siteor another Themeasy command. Typing/mcp__themeasy__siteworks too.
The commands start Claude on one kind of job. In the chat, ask for the same jobs in words.
| Command | What Claude does |
|---|---|
site |
Builds a whole site: its pages, header and footer |
one-page |
Builds a site on a single page, with anchored sections |
adapt |
Starts from the best-matching templates in the Themeasy Library: faster, and it uses less of your Claude plan |
studio |
Changes a site you already published, without erasing what you edited by hand |
template |
Builds one section |
Choose the model and effort
The effort changes the result: the default (medium) effort gives good sites, high gives great ones, and extra-high the best. Higher effort uses more of your Claude plan. For a whole site, use Opus with high or extra-high effort. Choose before you start:
- In the chat: click the model name, choose Effort, then the level.
- In Claude Code in the app: open the model picker and choose the level under Effort.
- In a terminal: type
/effortand pick the level, for example Extra high.
Publish to your site
When you're happy with it, ask Claude to publish the site to your WordPress site.
- With one site on your account, Claude publishes there.
- With several sites and none named, Claude asks you which one.
- A project remembers its site: once a project is published, later changes go back to the same site.
- A site joins your list once the Themeasy plugin on it is activated with your license. It can take a few minutes to show up.
- A local site (on your computer) works too.
Install it in WordPress
Back up first, or use a new site
Install creates or updates the pages, the global sections (the header, the footer and the other
sections) and the site settings, including the site title, the home page and the permalinks
(/%postname%/). The pages go live as published pages. Back up the site before you install, or
install on a new site or a staging copy.
- In WordPress, open Themeasy → AI Studio.
- Under Packages for this site, the site Claude published shows as Ready. If it isn't there yet, click Check for packages.
- Click Install. AI Studio downloads the package, checks its signature, and lists what it will write, each page marked New or Update.
- Click Install again to confirm. When Import finished appears, the report lists what the site still needs from you.

Changes after the first install
Ask Claude for the changes and to publish again. The new package updates the same pages, so it doesn't make copies.
- Pages you edited in Elementor since the last install are never replaced without asking. AI Studio lists them, and for each one you choose Keep mine or Replace with the package.
- Nothing is deleted. Pages that an earlier install made and the new package no longer has are listed under No longer in the package. Remove them yourself if you don't need them.
- The import log at the bottom of AI Studio records every install.
What we support
We support the Themeasy AI service, its checks and the plugin's AI Studio: connecting, signing in, publishing, installing, and a page that doesn't install or display as it should. We don't support the AI's own choices: the design, the copy, or how it reads your request. To change those, ask Claude for changes. For everything else, open a ticket.
Disconnect
- In the Claude app or on claude.ai: remove the connector from the connectors list (+ → Connectors in a chat).
- In a terminal: run
claude mcp remove themeasy.
To cut the connection on the Themeasy side as well, open a ticket.
Troubleshooting
▸ "Themeasy AI is not included in your plan"
The Themeasy account you signed in with has no active Pro or Agency subscription. The page names the account: check that it is the one that holds your subscription, or click See plans.
▸ AI Studio doesn't appear in the Themeasy menu
AI Studio appears when the plugin on that site is activated with a Pro or Agency license. Activate the license in the Plugin license section of the Themeasy page, and update the plugin.
▸ AI Studio says it needs a Themeasy theme
The site runs another theme. Activate a Themeasy theme (Pro and Agency include all of them) and open AI Studio again.
▸ Claude doesn't list my site
Activate the Themeasy plugin on that site with the license of the same Themeasy account you connected Claude with. Then wait a few minutes and ask Claude to list your sites again.
▸ Claude asks you to sign in to Themeasy again
Your sign-in has ended, for example after you disconnected it. In the Claude app or on claude.ai,
open the connectors list (+ → Connectors in a chat) and connect Themeasy again. In a
terminal, type /mcp, pick
themeasy and choose Authenticate.
Was this article helpful?